
Raptor Maps runs on an orders system. Every deliverable — a digital twin, an inspection report, a set of processed imagery — starts with an order submitted from your Raptor Maps account. This article walks through the full path: adding a new site, requesting an inspection, completing an order that's waiting on information, and tracking everything from the Orders page.
Before you begin
You'll need two permissions enabled on your account:
- Create New Solar Reports — lets you create and submit orders
- Upload Files — lets you attach as-builts and site documentation
Your organization's admin can enable both. If a button described in this article doesn't appear for you, permissions are the first thing to check. See How to Manage Users & Permissions.
If the screens below don't match what you see in your account, reach out to support@raptormaps.com
Which path do you need?
|
Your situation |
Where to go |
|---|---|
|
The site isn't in Raptor Maps yet |
Adding a New Site — this also submits the digitization request automatically |
|
The site exists and you want a new inspection |
|
|
A pre-populated order is sitting in Info Needed and needs details |
|
|
You just want to check on an order |
Adding a New Site
Before Raptor Maps can inspect a site, we build a digital twin of it — a digitized model of your asset that every later inspection is mapped onto. Adding a site and requesting that digitization now happen together in a single form.
Where to find it
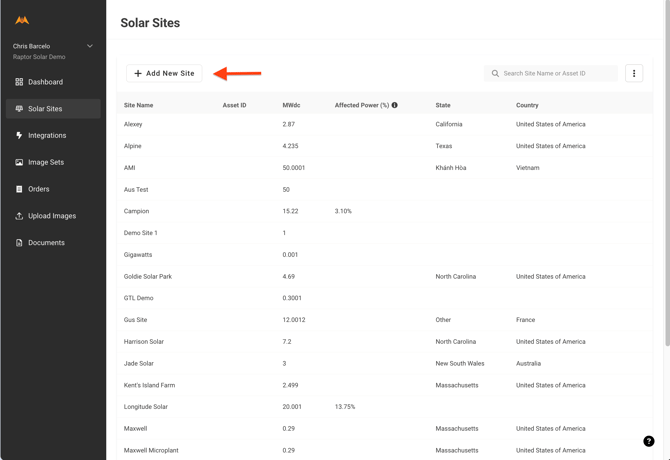
Go to Solar Sites and click Add New Site in the toolbar above the sites table. The form opens as a modal over the sites list — you won't navigate away from the page.
What to fill in
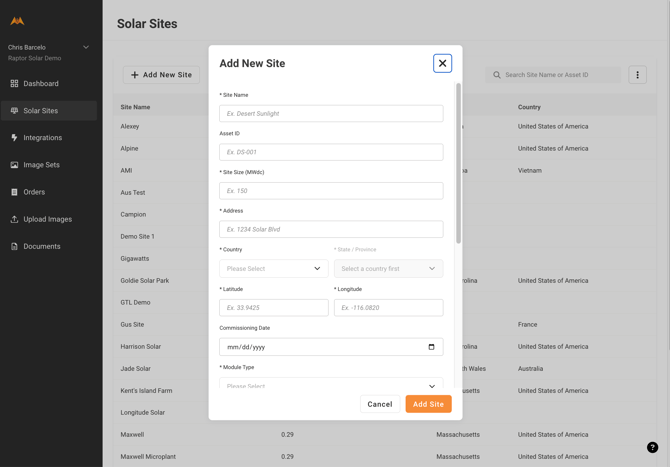
|
Field |
Required |
Notes |
|---|---|---|
|
Site Name |
Yes |
For example, "Desert Sunlight" |
|
Asset ID |
No |
Your own internal identifier for the site |
|
Site Size (MWdc) |
Yes |
Must be a positive number |
|
Address |
Yes |
Must be a complete address beginning with a street number |
|
Country |
Yes |
Searchable list |
|
State / Province |
Yes* |
Options depend on the country you select. *Not required for countries without states or provinces. |
|
Latitude / Longitude |
Yes |
Validated as real coordinates. Provide at least 5 decimal places for accuracy. |
|
Commissioning Date |
No |
|
|
Module Type |
Yes |
Multi-select from the equipment catalog |
|
Tracking / Mounting Technology |
Yes |
For example, "Fixed Tilt" |
|
String Layout |
Yes |
For example, "15 modules per string" |
|
Inverter Type |
Yes |
Multi-select from the catalog |
|
As-Built file |
Yes |
PDF, JPG, PNG, KML or KMZ. You can attach more than one file. |
Four things worth knowing
The as-built is mandatory. The site can't be submitted without one. Your as-built should include the overall site layout, electrical wiring diagrams, and inverter, combiner and string wiring with labels — incomplete drawings affect the quality of everything we deliver afterward. If you also have geospatial files (.kml or .kmz) with fence lines, row and tracker outlines, or row orientation, attach those too; they help with flight planning. KMLs don't replace an as-built. For the full breakdown, see Providing Information to Digitize Your Site.
The module and inverter lists are long. They load 50 at a time. Use the search box, or click Load 50 more at the bottom of the list to keep going.
If your inverter isn't listed, you can add it yourself. Use the link under the Inverter Type field — the new inverter is created, added to the catalog, and selected for your site without leaving the form. If your module isn't listed, email support@raptormaps.com and we'll add it.
Nothing is saved as a draft. Closing the form partway through asks you to confirm you want to discard your changes. Set aside a few minutes to complete it in one pass.
Digitization is requested for you
You don't need to create a separate digitization order. When you submit the form, a site digitization order is created automatically and moves to Submitted for our team to pick up. You'll be notified once the digital twin is ready to view on the web and mobile map.
What happens when you click "Add Site"
The button reports its progress through four steps:
- Creating site — your site record is created
- Adding equipment — your selected module and inverter types are linked to the site
- Submitting digitization order — the digitization order is created
- Uploading as-built — your attached files are uploaded
When all four finish you'll see Site created and the form closes.
If you see a message naming a specific step that failed — Adding equipment failed, Order creation failed, or As-built upload failed — your site was created but setup stopped partway through. Don't re-create the site. Email support@raptormaps.com with the site name and the message you saw, and we'll finish the setup for you.
Requesting an inspection on an existing site
Once a site has been digitized, you order inspections directly from its map — including partial inspections scoped to specific circuit blocks. This replaces the previous Circuit Block Order Submission Form.
Where to find it
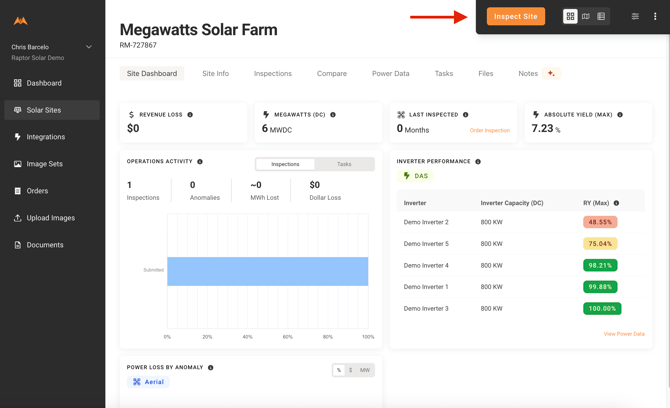
Open the site's digital twin map and click Inspect Site in the map toolbar. The order form opens in a sidebar beside the map, so the site stays visible while you work.
If you don't see the button, you don't have create permission on that site — an org admin can grant it.
The map and the form work together
This is the part that makes partial inspections straightforward:
- All circuit blocks are selected by default when the form opens.
- Selecting blocks on the map updates the Area to Inspect field, and changing the field updates the map. They stay in sync in both directions.
- Area to Inspect has a Select All / Deselect All option for quickly switching between a full-site and a partial inspection.
- The inspection name generates itself from the order type, site, and blocks you've selected, and keeps updating as your selection changes — until you type your own name, at which point it stops changing.
- Closing or navigating away clears your map selection, and you'll be warned that your progress will be lost.
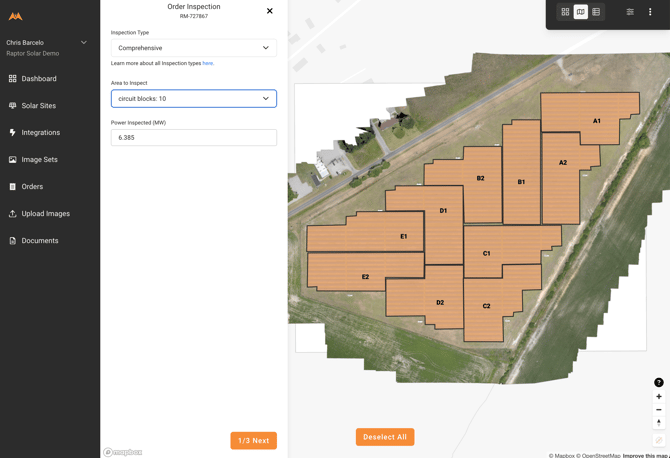
NOTE: For partial inspections, adjust the Power Inspected (MW) value to reflect only the blocks you selected, not the full site capacity.
Inspection type
- Order type
- Area to Inspect — the circuit blocks, tied to the map as described above
- Report provider — appears only for historical digitization orders where Raptor Maps is integrating a delivered report from a different provider into your account
- Power Inspected (MW)
Inspection details
- UAS Model — appears only for self collected data
- Inspection Name — auto-generated, and editable
- Inspection Requestor — pre-filled with your contact where possible; you can create a new contact inline
- Who should collect the data? — Raptor Maps, or your own organization. Not shown for historical digitization orders, since no flight is involved.
- Flight availability window — shown here only when Raptor Maps is flying the site
- Special Instructions - optional, for any special context
- Attach As-Built — attach an updated as-built if the site has changed since the last one you sent
Site contact
This step appears only when Raptor Maps is collecting the data, and always for Raptor Sentry organizations.
- Site Contact — the person on site
- Gate access code
- Flight availability window
If you're collecting the data yourself, the order is two steps. If Raptor Maps is flying it, it's three.
A note on flight windows: if your start and end date fall on the same day, you'll see a warning. Livestream, reactive fire, reactive security, and image capture inspections can usually be flown within 24 hours; other inspection types need more lead time. The warning won't block your submission — it's there so you can widen the window if your inspection type needs it.
What happens on submit
The order is created immediately in Submitted status — there's no pending stage in this flow. You'll see an Order Submitted confirmation with a View Order Details button.
If you're collecting the data yourself, this matters: the order details page holds your data upload link. That's how your imagery gets to us, and processing doesn't begin until a complete set of images has been uploaded. See Uploading & Confirming Images from Computer.
If the submission fails, your entries stay in the form so you can try again.
Completing a pending order
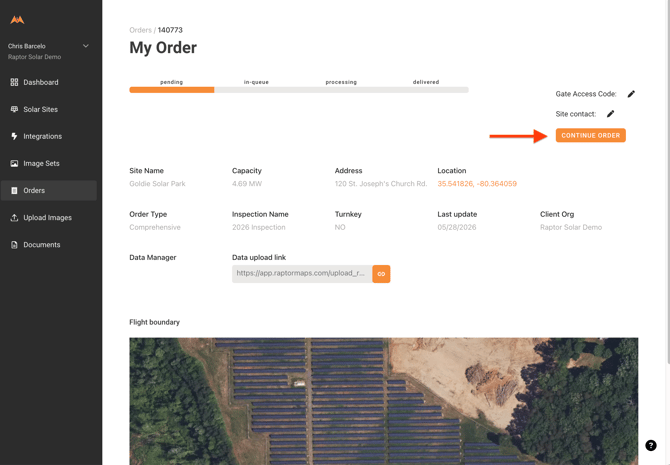
Some orders arrive in your account already created — most often turnkey orders where Raptor Maps is contracted to collect the data. These sit in Info Needed until you supply the inspection and site details.
Where to find it
From the Orders page, filter by Info Needed status, open the order, and click Continue order on the order details page. A short two-step Complete Order form opens.
Inspection details
- Order type — for example overview, standard, construction, historical digitization, or instant
- Report provider — appears only for historical digitization orders
- Power Inspected (MW)
- UAS Model — appears only for instant orders
- Inspection Name — pre-filled from the existing order. If you clear it, a name is generated for you.
- Inspection Requestor — a contact from your organization; you can create a new contact inline
- Special Instructions
Circuit blocks can't be changed here. The order keeps whatever area was selected when it was originally created. If you need a different scope, contact support@raptormaps.com — that's a separate change.
Data collection
- Who should collect the data? — Raptor Maps, or your own organization. Not shown for historical digitization orders.
- Flight availability window — a start and end date, shown only when Raptor Maps is flying the site. If you're collecting the data yourself, this is hidden, since you schedule your own flights.
- Attach As-Built
- Site Contact — required when Raptor Maps is collecting the data
- Gate access code — required when Raptor Maps is collecting the data
For Raptor Sentry organizations, Raptor Maps data collection is applied automatically and you won't see the choice.
Each step validates before letting you continue, so any errors appear on the step they belong to rather than all at the end.
What happens on submit
Your details are saved and the order moves from Info Needed to Submitted. The order details page refreshes with the new status and flight events.
If something goes wrong you'll see There was an error completing the order, and the form stays open with your entries intact so you can retry.
Viewing and Tracking Your Orders
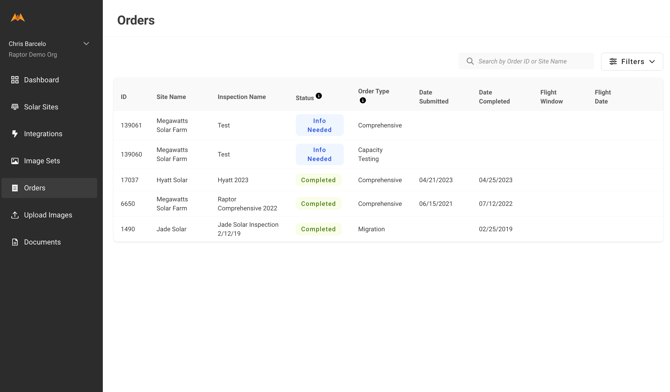
The Orders page lists ongoing and completed orders together. From there you can:
- Search by site name or Order ID
- Filter by order status and other categories
- Sort by any column
- Jump straight to results — hover over a completed order to open its digital twin or inspection report directly
Order Statuses
|
Status |
What it means |
|---|---|
|
Info Needed |
The order needs additional information from you before it can proceed |
|
Submitted |
Received and under review by Raptor Maps |
|
Digitizing Site |
Your digital twin is being built |
|
Flight Date Needed |
Waiting on a confirmed flight date |
|
Awaiting Your Data |
Waiting for you to complete your flight and upload the imagery |
|
Awaiting Raptor Maps Flight |
The flight is scheduled but hasn't been flown yet |
|
Data Uploading |
Data is being uploaded to the system |
|
Checking Data |
Quality review is in progress |
|
Data Quality Issue |
An issue was found with the data and a reflight is needed |
|
Analyzing Data |
Analysis is underway |
|
Completed |
Your inspection has been delivered |
For more on what each order type covers, see Order Types.
Troubleshooting
|
What you're seeing |
What's going on |
|---|---|
|
"I don't see the Add New Site button" |
Your organization may still be on the previous site registration experience, or you may not have the Create New Solar Reports permission. Contact support and we'll confirm which. |
|
"It won't let me submit my new site" |
Most often a missing as-built, which is required — or a required field further up the form. Scroll up to check for highlighted fields. |
|
"My module or inverter isn't in the list" |
Inverters you can add yourself from the link under the field. For modules, email support@raptormaps.com. |
|
"I got a message that adding equipment, order creation, or as-built upload failed" |
Your site was created but setup stopped partway. Don't re-create it — contact support and we'll assist. |
|
"I don't see the Inspect Site button" |
You don't have create permission on that site. An org admin can grant it. |
|
"I can't change the flight dates" |
The order is set to your organization collecting the data. Flight dates are only yours to choose when Raptor Maps is flying the site. |
|
"I can't change the circuit blocks when completing an order" |
That's expected — the area is fixed when the order is first created. Contact support if the scope needs to change. |
|
"My inspection name keeps changing on its own" |
It auto-generates from the order type and your selected circuit blocks. Type your own name and it will stop updating. |
|
"Where do I upload my imagery?" |
The data upload link on the order details page. |
|
"Continue order looks different than my colleague's screen" |
Your organizations are on different versions of the ordering experience. Contact support and we'll orient you to yours. |
Questions? Reach out to support@raptormaps.com.